RCM Level Prep Apps

This partnership with RCM focused on analyzing the experience of the RCM Level Prep Apps. For this Design Sprint, the emphasis was on improving the "Catch the Egg" task within each of the five Level Prep Apps.
Year
Winter 2018
Team
Jenna Mussar, Maureen Ariza Paredes, Steven Holoubeshen, Soham Vayawhere
Client
The Royal Conservatory of Music
Skills
UX Design
Design Sprints
Prototyping
User Testing
Overview
So, what’s a design sprint?
A Design Sprint is a five-day framework developed by Google Ventures to help teams break away from traditional design and iteration cycles. Instead, they follow a structured, design-thinking-driven process to rapidly solve problems. Each day focuses on a different phase, from ideation to prototyping and user testing, leading to a validated solution or a clearly defined goal by the sprint’s end.
Why run a design sprint?
A Design Sprint helps teams quickly answer key questions and spot potential roadblocks before development goes too far. By condensing months of work into five days, it reduces risk, saves time, and ensures teams stay on the right track.
It’s also a highly interactive process—like a designer’s summer camp—where teams brainstorm, sketch, debate, and test ideas. By the end, they walk away with fresh insights, a tested prototype, and a validated solution. Plus, it’s a great team-building experience, bringing together execs, product managers, developers, marketers, and UX designers.
The Sprint Challenge
To improve the user experience of the “Catch the Egg” task in each of the five Level Prep apps offered by RCM so that RCM will see a higher level of engagement from its users, resulting in more downloads, traffic, and a higher conversion rate in the form of in-app purchases, within the year following design iterations and improvements.
The Sprint Process
The sprint process almost always looks something like this diagram, though it doesn't have to be identical! It's important that the sprint and daily design activities are tailored to ensure the results, deliverables and data relative to solving the design problem or bringing an idea to fruition as fully conceived as possible are received within five days.

Sprint Planning
For this sprint, a room with a large whiteboard was rented. On it, the day’s tasks and activities were written to ensure each team member started the day understanding precisely which activities were taking place and the end-of-day goal. See our sprint planning outline below.
Monday: Map
Monday kicks off the sprint with structured discussions to quickly gather information and stay focused. We’ll define key questions and a long-term goal, map the product or service, gather insights from experts, and select a key target representing the biggest risk or opportunity.
Tuesday: Sketch
Tuesday is about solving the problem, using a method optimized for deep thinking. Instead of a typical group brainstorm, every individual will sketch their own detailed, opinionated solutions, following a four-step process that emphasizes critical thinking over artistry.
Wednesday: Decide
By Wednesday morning, we’ll have a stack of solutions. Now, we have to decide which of those sketches should be prototyped and tested.
Thursday: Prototype
On Thursday, we'll build a realistic prototype of the solutions in our storyboard so we can simulate a finished product for our users. Design Sprint prototyping is all about a "fake it till you make it" philosophy: With a realistic-looking prototype, we'll get the best possible data from Friday's test, and we'll learn whether we're on the right track.
Friday: Decide
It's time to put our prototype to the test! On Friday, we'll show our prototype to five users in separate, one-on-one interviews. Instead of waiting for a launch to get perfect data, we'll get quick-and-dirty answers to our most pressing questions right away.
Sprint Kickoff
Refer to the Sprint Planning outline to learn more about each day’s goals and progress!
Monday: Map
On Monday, the challenge was introduced with an overview of the sprint. The Sprint team used Test Flight to download the app on an iPad and navigate through the application to ensure we fully understood its functions and services. We specifically focused on the Level Prep app's user flow & journey. While mapping out the user journey, we also noted the pain points. We did this in a similar fashion to how a heuristic evaluation would be conducted, and ranked usability issues based on compliance with Jakob Nielsen's Discount Usability testing methods. This process functioned as our own in-house user testing. The resulting deliverable was a user journey map that prioritized the application's pain points and narrowed our focus to specific areas of improvement. Next, we:
Reframed problems as opportunities
Created ‘How might we?’ statements

How might we make catching eggs easier with less room for error?
How might we use audio-visual cues to help users learn?
How might we improve the instructions/tutorial so users can feel comfortable and confident in their ability to complete the task?
How might we make the game easier to understand?
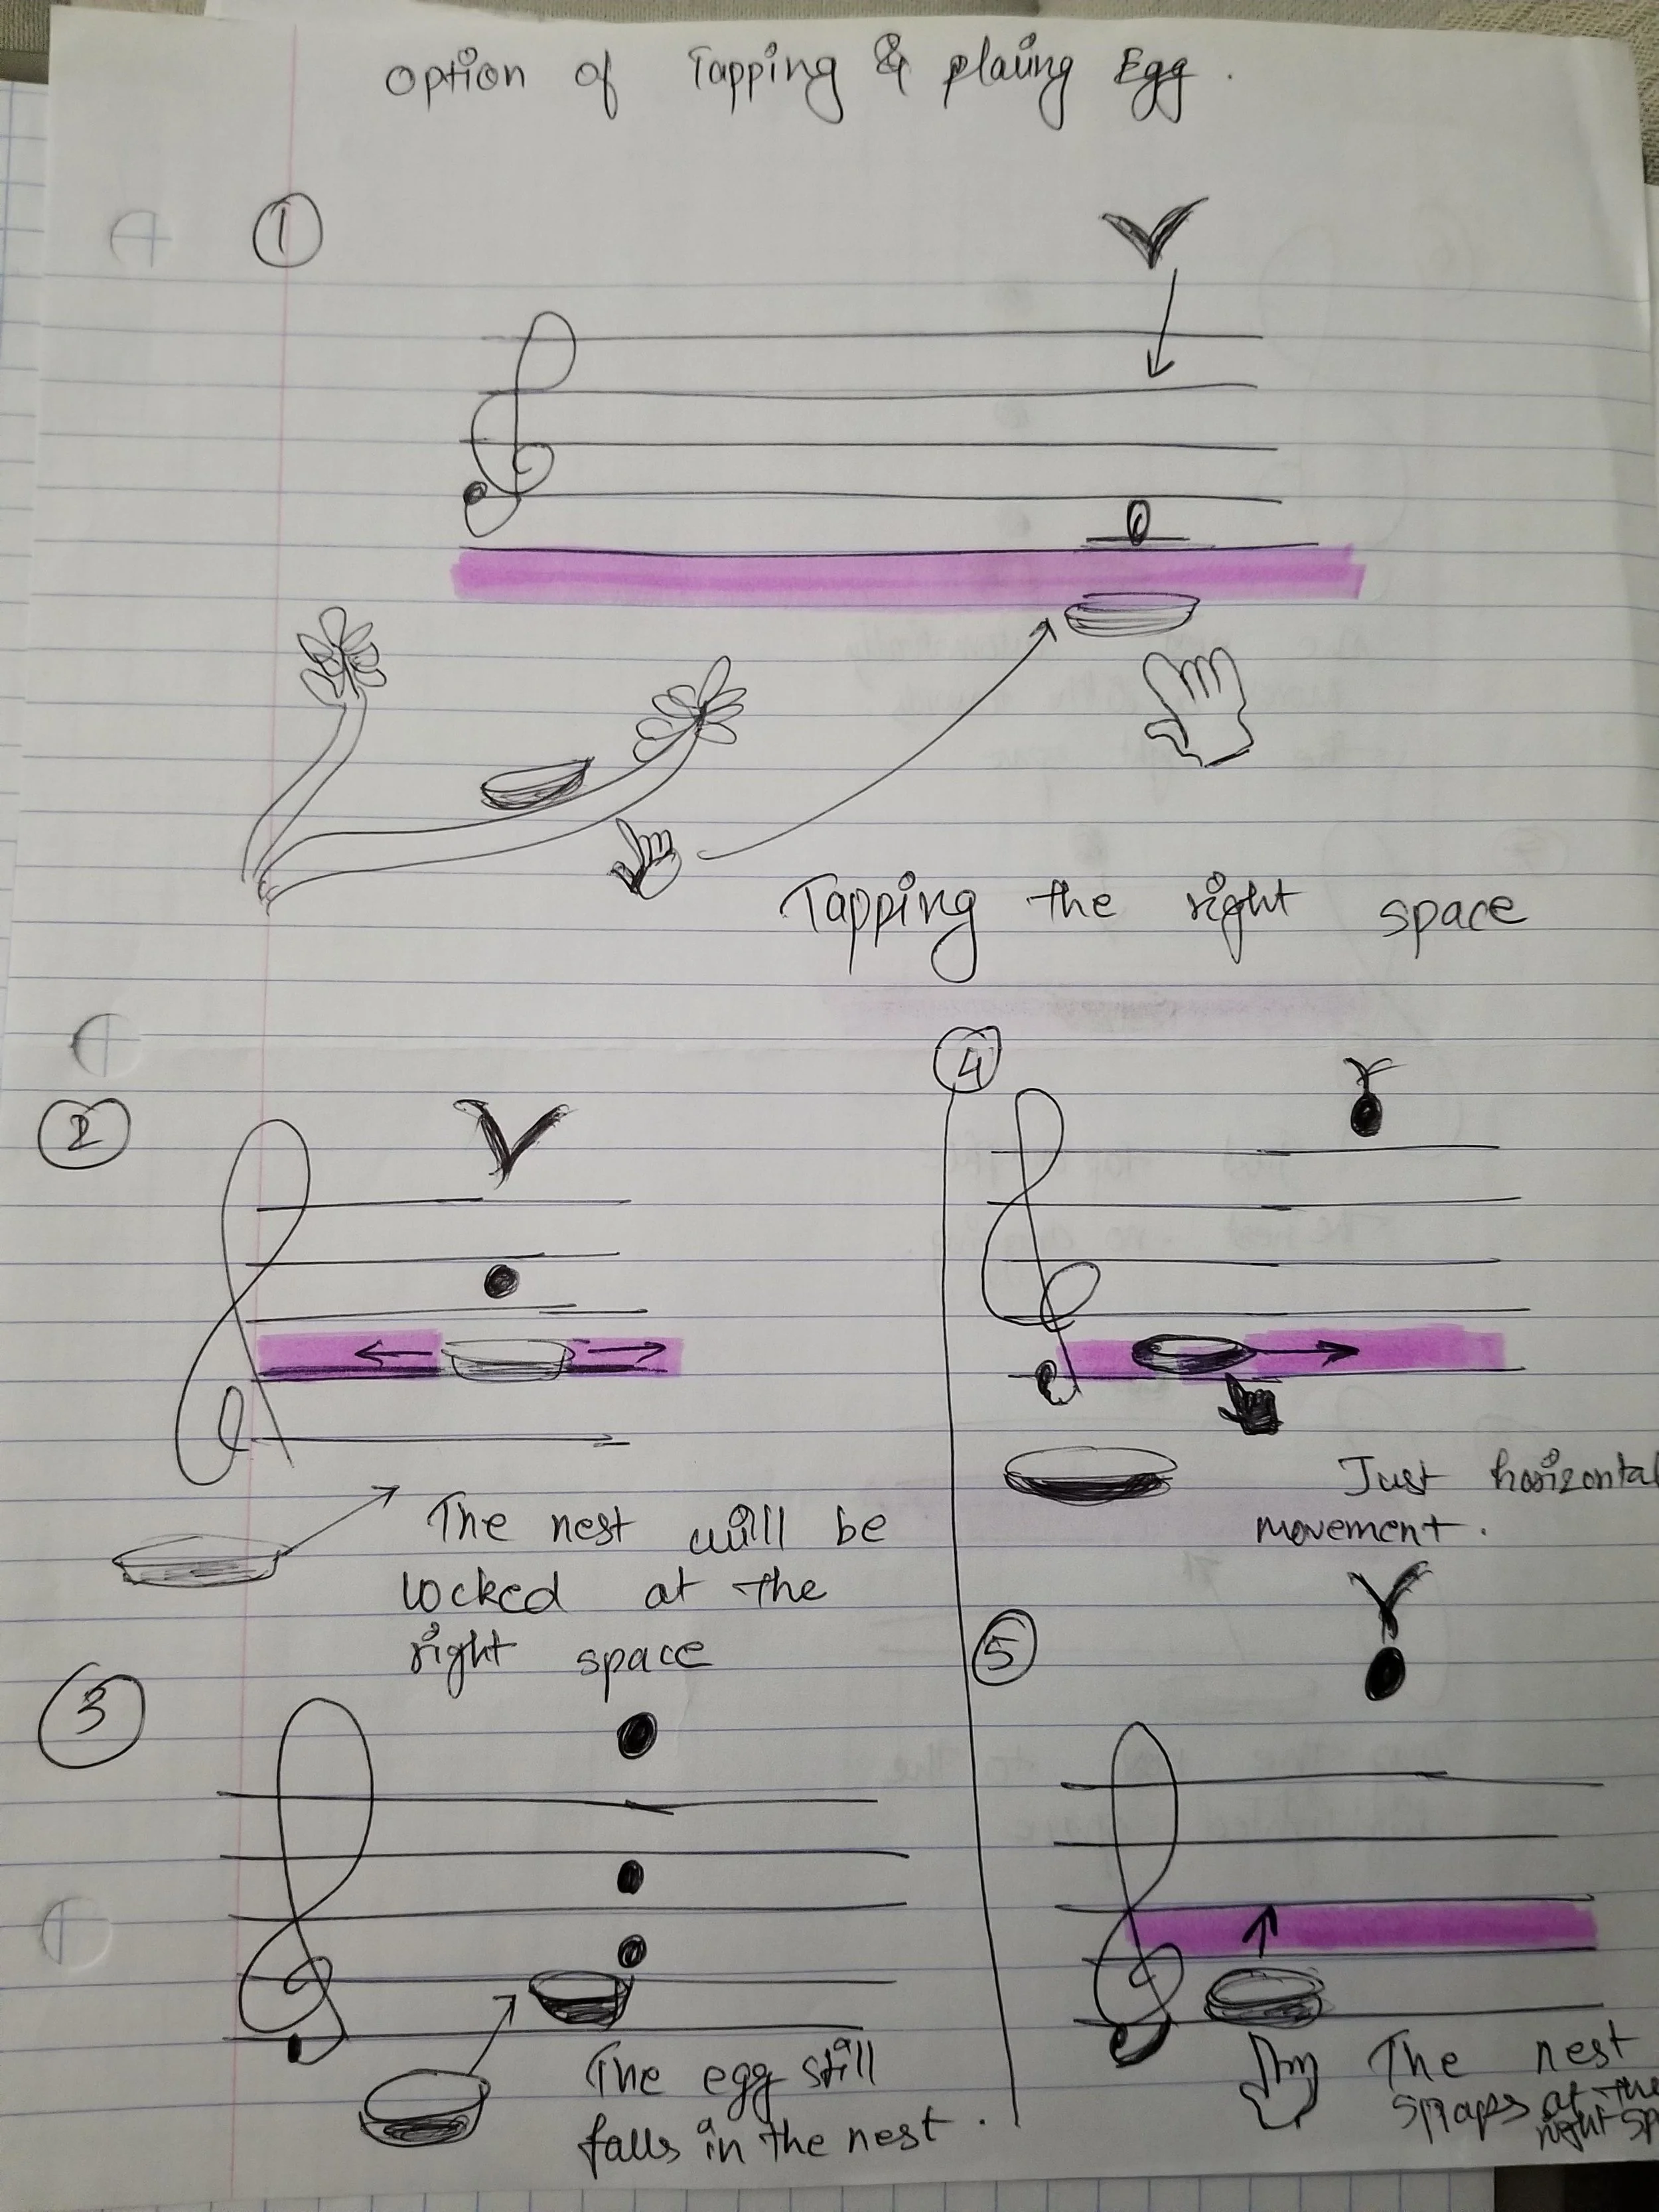
How Might We?
“The egg catching game is difficult and picky. It’s hard to “catch” the egg even if you’re in the right space.”
Tuesday: Sketch
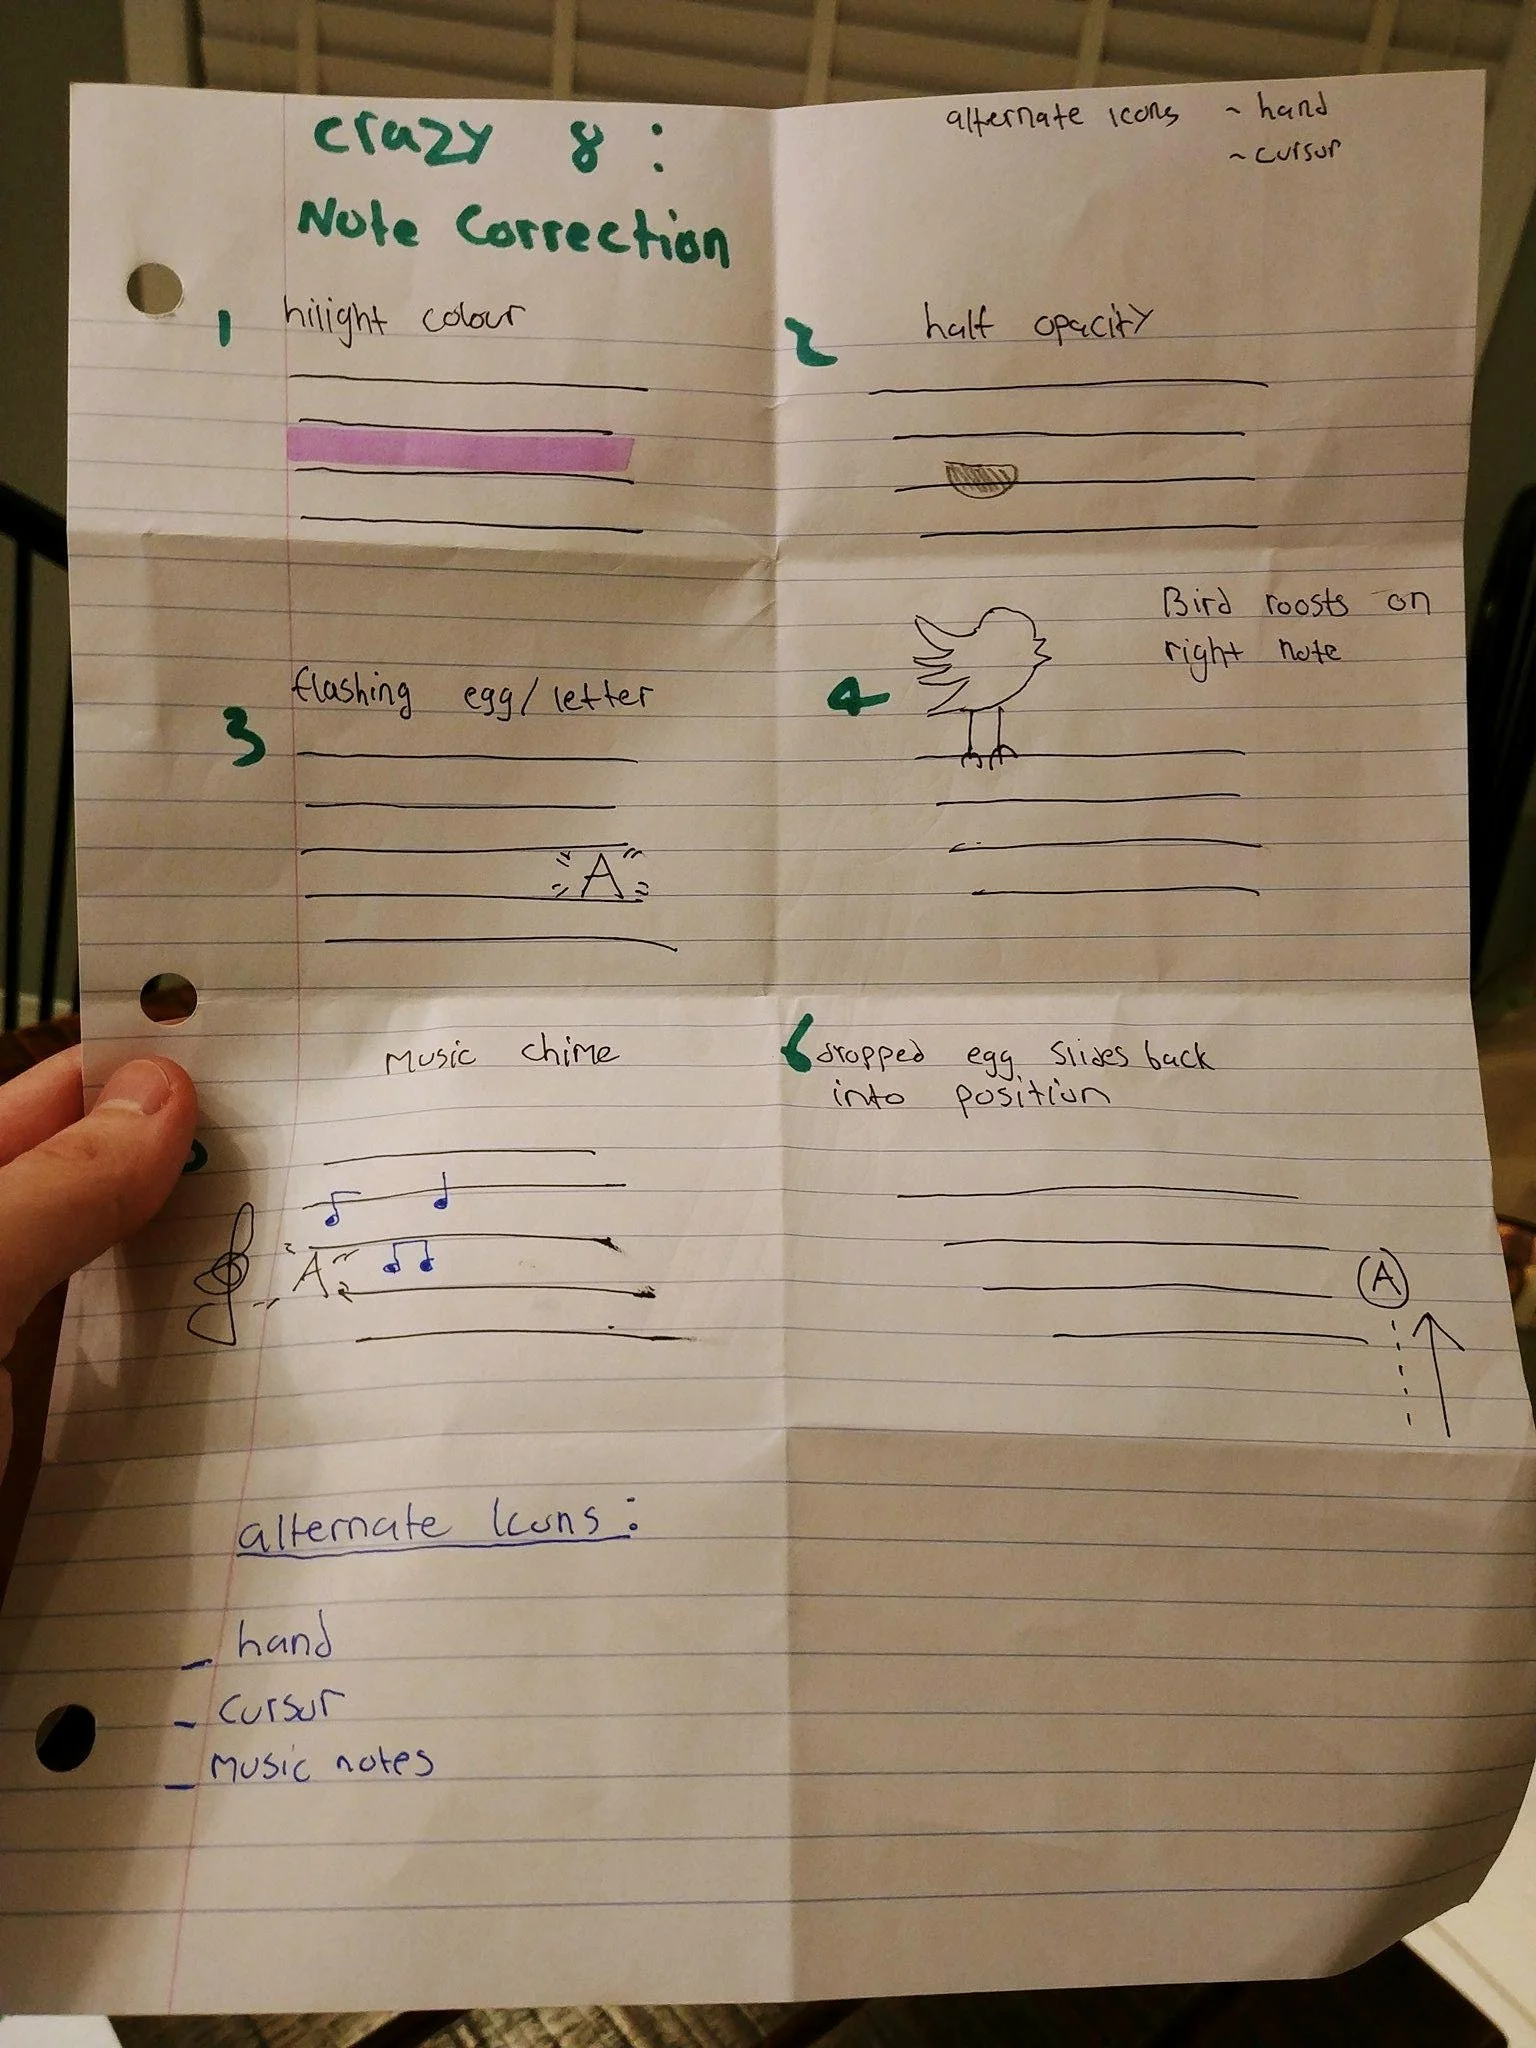
On Tuesday, the sprint team reviewed all work completed on Monday. We also conducted lightning demos, which allowed us to capture as many quality ideas as possible in a short amount of time with quick drawings. This process consisted of each team member roughly jotting down as many ideas as possible (ideally eight; one per minute for eight minutes) through images on a single sheet of paper - this process is commonly known as Crazy 8s. Individual ideas were then shared with the team, and the best and most promising were decided upon. Refer to the diagram for a quick tutorial on how to conduct crazy 8s!


Wednesday: Decide
On Wednesday, the sprint team reviewed the work and deliverables created on Tuesday. We decided upon the best solutions discovered through conducting Crazy 8s and fine-tuned the ideas before drawing our storyboards. We then began storyboarding, a crucial step before prototyping, as it allowed us to visually predict and explore the user's experience with our version of the RCM Level Prep app's "Catch the Egg" task. Storyboarding also gave us a sense of how our user would flow through the interaction over time, a first glance into deciphering whether our changes had improved the pain points we initially highlighted and prioritized.
Refined Ideas
Signifier on the correct line if note is missed
Musical chimes to match the letters being dropped
Preview of next eggs/notes to be dropped
Easy mode: egg matches line/space colour
Include a hint if the user is having difficulty placing the egg
Include a variation of egg sizes to further differentiate the notes for non-readers
Include a tutorial screen before the start of the game
Make the basket more forgiving and snappy (larger hit box)


Thursday: Prototype
On Thursday, a prototype of the new instructional screen for the RCM “Catch the Egg” task was created. This prototype was based on the refined ideas created on Wednesday.

Friday: Test
User Testing
On Friday, four users (2-5 yrs, 9 yrs, 11 yrs) were tested. Each user was asked to observe/read RCM’s existing instructional screen and play the game. Next, each participant was shown our prototype of the instructional screen and asked to play. The results were recorded.
Summary of Results
Participants understood the game more thoroughly when utilizing our instructional prototype. However, similar issues ensued as features concerning the hitbox surrounding the nest (which we could not improve) appeared to be the main problem related to the “Catch the Egg” task. Our stakeholders were notified that this was an urgent usability issue that should be addressed by development.

Following the results from user testing, changes were made to the instructional screen. These changes were implemented to enhance the user experience and improve learning. The changes made included:
Adding coloured eggs with their corresponding note names on the correct staff line.
A button leading to the instructional screen was added to the game screen for convenience. This allows users to easily re-access the instruction screen when needed, eliminating the previous need to exit the game and navigate to the previous lessons for an instructional refresh.
Second Iteration of the Catch the Egg Tutorial Screen

Video Tutorial
A video tutorial was also created to ensure that there was as little room as possible for users to misunderstand the task and how to complete it.